■ ACMT/ 邱耀弘
2.1.2 Properties of PM materials
粉末冶金材料的性能注意翻譯按照有關英式英文內容以更改為美式英文,請對照PDF 原文檔案。有錯誤與不懂之處。歡迎討論!粗體字為譯者補充說明。
譯者:鄧忠勇博士- 湖南英捷高科/ 湖南恆基粉末科技
技術總監,2015/05/06 助理編輯:邱耀弘博士
The alloying and processing of the PM parts are of crucial importance due to the fact that the properties of PM materials are determined by three controlling factors:
PM 材料的性能取決於三個控制因素:
・Porosity/Density: volume percent, size, shape,spatial distribution and interconnectivity of the pore structure孔隙率/ 密度:孔隙的體積分數、尺度、形狀、空間分佈、連通性
・C omp o s i t i o n a n d A l l o y i n g M e t h o d : t h e distribution of alloying additives is determined by the methods used to manufacture the base powder and final powder mixture, in addition to the thermal processing sequence employed to make the part.成分及合金化途徑:基礎粉末及粉末混合體的製備方法以及後續的燒結過程決定了合金元素在燒結材料中的分佈
・M i c r o s t r u c t u r e : t h e c o m b i n a t i o n o f transformation products is determined by the local chemical composition, the cooling rate in the sintering furnace and any secondary thermal treatments.顯微組織:微區化學成分、燒結設備的冷卻速度、後續熱處理等決定該區域的相組成
Clearly, local chemical composition and cooling rate have a huge impact, not only on the part behavior in use, but also on how the sections should be prepared for metallographic analysis.顯然,材料中各局部的化學成分和冷卻速度不但對製品的使用性能有重大影響,同時也決定了金相樣品的製備方法。
This discussion of PM alloying and processing is important from a metallographic standpoint because the individual transformation products have different physical properties and chemical activity. In looking at the physical properties, constituents and phases often vary in hardness and the softer areas may polish at a faster rate compared with the harder areas. This is especially important during final polishing where excessive polishing time, pressure or the incorrect polishing cloth could result in unwanted surface relief and an improper characterization of the microstructure. The variation in chemical activity often results in differences in etching rates, where one region in the microstructure might appear over-etched or under-etched compared with other transformation products in the same field of view.之所以要花這麼多篇幅來介紹合金化與粉末冶金過程,是因為它們都對材料中的相變產物有重要影響。每一種相變產物都具有不同的物理和化學特性,需要在金相樣品製備時進行針對性考慮。從物理特性來講,不同的相或組織具有不同的硬度,較軟的區域在拋光時會更快地磨蝕,對於金相樣品的最終拋光來講,就要特別注意材料的特性,過長的拋光時間、過高的拋光壓力或者是不合適的拋光布會導致樣品表面拋光過度,不能準確地顯露材料的組織。微區化學活性差異對金相樣品的影響主要表現在各種相變產物蝕刻速度的差異上,導致過蝕或欠蝕的發生。

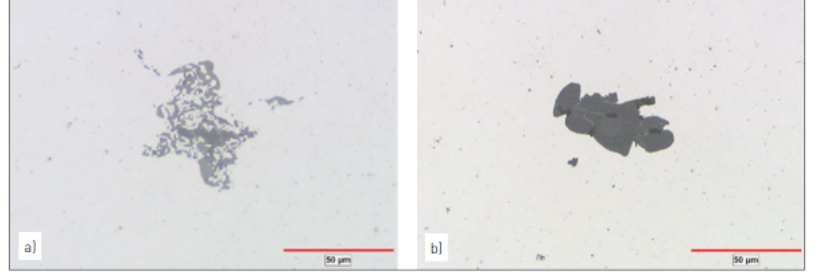
P2-Fig.2 Image a) shows inclusions composed primarily of MnS and characterized by a light shade of gray.
Image b) shows several dark gray oxides in a multi-phase inclusion (un-etched)影像a) 表示夾雜物組成主要是MnS,顯示一種灰色的影響;b) 顯示則為數個深灰色的氧化夾雜在未經蝕刻的多重相影像上
2.2 Sample selection, preparation and examination 樣品選擇、製備及檢測
Several techniques for sample selection and preparation were discussed in the first part of this two-part article [1]. As emphasized in Part1, preparing the samples correctly is essential for performing an accurate assessment of the microstructure. The amount of reliable information available from a poorly prepared sample is minimal at best and the results from such samples could lead to incorrect conclusions. Conversely, when the sample is prepared correctly and the microstructural features are present in an unaltered condition and location, the results are correct and factual.前一篇文章中已經討論了幾種樣品選擇和製備的技術,正確的製樣才能保證顯微組織的精確評定。如果樣品製備不當,我們從樣品中能獲得的可靠資訊就會變少,進而可能誤導最終結論。相反,正確的製樣能夠保證材料的顯微組織特徵被準確顯露,從而獲得真實可靠的結果。
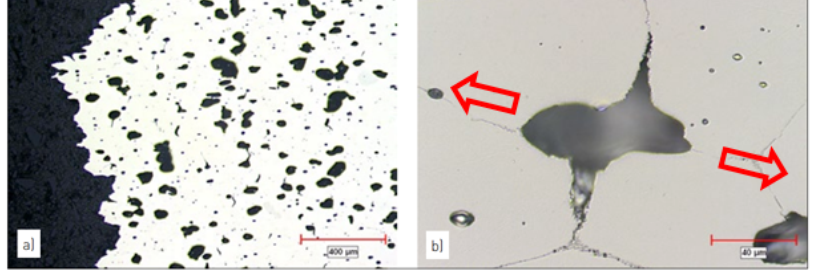
 P2-Fig.3 Images of pores and cracks in a tensile tested part containing precipitation throughout the grain boundaries. The pores and fracture surface edge are seen in a) and a pore containing cracks perpendicular to
the stress direction is seen in b) (un-etched)影像a) 觀察經過拉伸測試的樣品發現,其中包含夾雜物穿過晶界的影像中出現很多孔和裂痕,b) 可看到這些孔和裂縫的邊緣都是垂直著拉伸應力施加的方向( 紅色箭頭為應力施加的方向)
2.2.1 Two stage evaluation 兩步法評估
Under normal circumstances, a metallographic analysis is separated into two stages; the first in the as-polished (un-etched) condition and the second with the microstructure revealed using chemical or optical means. The initial as-polished examination provides information based on the interaction of the sample surface with the light from the microscope. Since the prepared samples are opaque, all information is based on how the light is reflected from the surface. Features characterized by specific colors or grey shades are visible against the highly reflective metallic matrix due to the variation in the light absorbed and reflected by specific areas on the surface.
通常情況下,金相組織分析分成兩個步驟:首先分析拋光樣品( 未蝕刻),然後分析通過化學或偏光法顯露的顯微組織。由於金相樣品是不透光的,因此在顯微鏡下獲得的所有關於樣品表面的資訊都來源於其對光線的反射。由於樣品不同區域對光線的吸收或反射的程度不同,我們就可以從圖像上看到由不同顏色或灰度所表示的組織特徵。
2.2.2 Distinguishing grey levels分辨灰度等級
With grey features, the difference in reflectivity must be >10% compared with the surrounding material in order to separate one area from another. Being able to distinguish multiple grey levels is important with features such as nonmetallic inclusions where several oxides or sulphides may be present in one complex feature. The individual oxides or sulphides are often different in terms of the amount of light they reflect, i.e. their grey level. This can be seen in P2-Fig.2a and 2b, where images of two nonmetallic inclusions are seen. In P2-Fig.2a, the inclusions are light grey sulphides, while, in P2 Fig.2b, the inclusion is a dark grey oxide. Other important features distinguished by grey level are shown in P2-Fig.3. These are pores, cracks, and an exposed fracture surface cross-section where the features are composed of void space and consequently
have no light reflection.在灰度圖像中,兩相鄰組織對光線的反射能力差異需要大於10% 才能保證這兩個區域能被區分開來。有時候在同一視場中可能存在多種組織,比如幾種氧化物、硫化物等非金屬夾雜並存,這時候能夠準確分辨其形成的多重灰度圖像對於準確鑑別這些組元就非常重要了。這些氧化物或硫化物對光線的反射能力各不相同,在金相圖片中就表現為不同的灰度等級。如P2- 圖.2a 和2b 所示,圖片中包含兩種不同的非金屬夾雜。 P2- 圖.2a 中,夾雜物是淺灰色的硫化物,P2- 圖.2b 中的夾雜物則是深灰色的氧化物。 P2- 圖.3所示是另一些可以由灰度差異來分辨的特徵,有孔洞、裂紋以及一個斷裂面的橫截面,這些地方由於存在空洞,所以不反射光線,在圖片上就表現為黑色。
2.2.3 As-polished surfaces 抛光面
Various microscope techniques can also be used to provide additional information while the sample is in the as-polished condition. These will be discussed in more detail later in this article. Two techniques can be used. Relief intentionally polished into the surface can be useful in showing variations in local hardness between features, where overpolishing a sample in the final preparation stages will show height differences between the hard and soft components. A second technique, polarized light, can be used to distinguish features that are cubic (isotropic) in crystal structure from non-cubic (anisotropic) features. As-polished surfaces are used frequently in the quantitative analysis of the nonmetallic inclusion content in powder forged specimens and to evaluate the effectiveness of the sintering process on porous samples by measuring the shape, size and distribution of the pore crosssections. Using quantitative microscopy (stereology) to estimate the ratio of the pore surface to material volume is also an indicator of the response of the material to alloying and sintering.不同的顯微鏡技術可以提供拋光後的樣品更多的訊息。有兩種常用的方法來檢查樣品的拋光錶面,一是有意的對樣品表面進行過度拋光,由於不同相變產物的硬度有差異,在過拋光情況下就會在表面產生浮雕效果,我們就能通過對拋光錶面的觀察很容易地區分哪些區域是硬質相、哪些區域是軟質相。另一種方法是用偏振光觀察樣品的拋光錶面,可以分辨出立方晶格相( 各向同性) 和非立方晶格相( 各相異性)。對於粉末鍛造的樣品,拋光面檢查通常被用來作非金屬夾雜物的定量分析,而對於其它的粉末冶金製品,通過分析樣品中孔洞的形狀、尺寸以及分佈,可以幫助我們評估製品的燒結效果。通過圖像定量分析軟體來確定樣品的孔隙率,也可以當作材料合金化與燒結行為的一個評價指標。
“Various microscope techniques can also be used to provide additional information while the sample is in the as-polished condition”不同顯微鏡技術可以提供拋光後的樣品更多的訊息■


