■ ACMT/ 邱耀弘
2.4.3 Cross-product contaminant 雜質辨識
With PM steels, stain etching usually uses a combination of a dilute acid pre-etch (nital, picral or a combination of the two) to roughen the freshly prepared surface followed by immersion in an aqueous solution designed to deposit an oxide, sulphide, sulphate or molybdate interference layer onto the pre-etched surface. This layer appears as a controlled stain with the composition and thickness determined by the local chemical composition, transformation product, phase, microstructural/crystal orientation, exposure time,etc. at the sample surface. As the thickness changes locally, the colour resulting from interaction of the light with the interference layer also changes. Several examples are included that illustrate the use of these techniques with PM materials.粉末冶金材料的蝕刻- 著色技術通常包括以下過程:首先以稀酸( 硝酸、苦味酸或兩者的混合物) 對樣品表面進行預蝕刻,使其粗糙化,然後將樣品浸入特製的著色液中,使樣品表面沉積出氧化物、硫化物、硫酸鹽、鉬酸鹽等,形成乾涉膜。樣品局部的化學成份、相變產物、晶格取向、著色時間等都會影響到沉積產物的成分和厚度,進而使這些區域顯示出特定的顏色。當乾涉膜的厚度發生改變時,由於光線和乾涉膜的相互作用,會使得相應區域的顏色發生改變。下面展示幾組運用這項技術的金相實例。
2.4.3 Cross-product contaminant 雜質辨識
One of these etch/stain procedures is used to differentiate cross-product contaminant powder particles in an alloy with higher or lower alloy content. After staining, the appearance of the contaminant particles is contrasted against the matrix material. In this condition, quantitative microscopy in the form of a systematic point count is performed on the sample surface to estimate the amount of contamination contained in a batch of powder. This test method has been adopted by the ASTM as a standard test method and is designated B795.在粉末冶金生產過程中有時候會發生不同物料間的交叉污染,使物料中帶入污染顆粒( 顆粒中合金元素含量比正常合金更高或更低),通過著色技術可以使這些污染物與基體之間產生明顯的對比度差異,從而幫助我們識別出材料中的異常物質。再通過圖像計數技術,可以估算出一批粉末原料受污染的程度。 ASTM 將此規定為一種標準檢測方式(B795)。

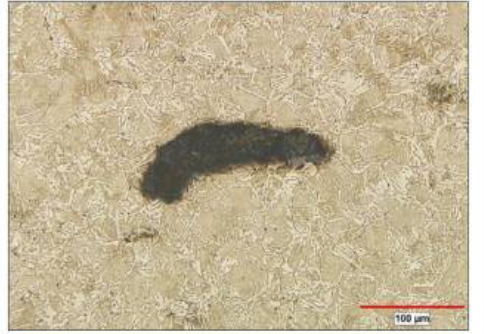
P2-Fig.9 An unalloyed Fe particle shown as a darkened feature in a pore-free, powder forged low alloy steel (2
vol/o nital + 4 wt/o picral then Beraha’s 3-10)一個純粹的鐵顆粒表現為黑暗的特徵在一個無孔的,粉末鍛造的低合金鋼中呈現極黑的顏色(2 vol% 稀釋硝酸+ 4wt% 稀釋苦味酸於Beraha 的書3-10)

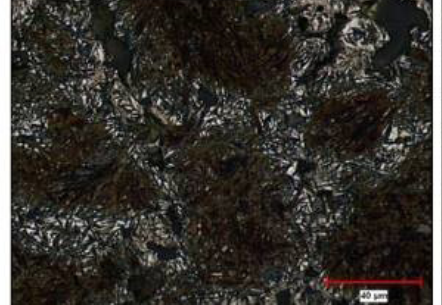
P2-Fig.10 Surface of a sinter-hardening alloy after accelerated cooling. The majority of the microstructure is martensite with the small, angular, white features of retained austenite located at particle and grain boundaries. (2 vol.% nital + 4 wt .% picral then 25 wt.% sodium bisulphite)加速冷卻後燒結硬化合金的表面。大多數的顯微組織是馬氏體與小,角,白色的功能,位於在顆粒和晶界的殘餘奧氏體。(2 vol% 稀釋硝酸+ 4 wt% 稀釋苦味酸然後使用25wt% 的亞硫酸氫鈉進行蝕刻)
An example of an unalloyed Fe particle in a lowalloy steel powder is shown in P2-Fig.9. The Fe particle is stained with a heavier, darker layer and can be distinguished from the surrounding material due to the lower alloy content and correspondingly higher chemical activity (less corrosion resistance) compared with the surrounding low-alloy matrix.The thickness, and consequently the darkness of the deposited layer, is determined by the relative local chemical activity on the sample surface.P2- 圖.9 所示為被純鐵顆粒污染的一種低合金鋼的金相照片。由於夾雜鐵粉中合金元素含量很低,因此與正常基體相比其化學活性更高( 耐腐蝕性更低),經過著色處理後鐵粉顆粒上就沉積出更厚、更黑的干涉膜,可以從圖像上明顯地識別出來。
2.4.5 Retained austenite in PM parts粉末冶金件的殘留奧氏體識別
The second etch/stain example involves the determination of the amount and location of retained austenite in PM parts. The presence of retained austenite is of great interest but can be difficult to measure in PM materials. This is caused by the alloying methods and sintering processes that define the alloy distribution and, consequently, the local hardenability. The higheralloyed areas are more hardenable and may be more susceptible to retaining untransformed austenite upon cooling.著色技術的第二個應用案例是用於PM 零件中殘餘奧氏體的定量分析及分佈觀察。合金化途徑、燒結過程都會影響到燒結合金中的元素分佈,進而影響到材料的硬化行為,合金元素含量高的區域在冷卻過程中的硬化趨勢更強,也更容易形成殘餘奧氏體。因此,了解殘餘奧氏體分佈和數量對PM 零件具有很重要的意義,但是在常規金相照片中難於量度。
The etch/stain procedure is used to darken the martensite while leaving the retained austenite white. The contrast between the two constituents clearly separates the features of interest (retained austenite) from the remainder of the microstructure and permits determination of both the locations and amount in the part volume. In P2-Fig.10, asinter-hardening alloy with elemental additions of 2wt.% Cu and 0.9 wt.% graphite has been sintered, then cooled with accelerated cooling. The stain darkens the Martensite, with retained austenite shown as the small, angular, white regions along the pore edges and grain boundaries. These are the areas more heavily alloyed with Cu and locally higher in hardenability compared with the particle centers. No retained austenite is apparent in the centres of the larger base lowalloy particles.
蝕刻/ 著色處理可以在保持殘餘奧氏體相白亮的同時使馬氏體相顏色變深,使兩種物相之間產生明顯的對比度差異,然後就可以從圖像中檢測出殘餘奧氏體在材料中的含量和分佈了。 P2- 圖.10 所示為以純元素粉法製備的含銅2wt%,碳0.9wt% 的燒結硬化鋼快冷後的金相照片。經著色後,馬氏體相在圖像中為深色,殘餘奧氏體相為沿孔隙和晶界分佈的小塊多角形白亮區域。這些區域與原始顆粒中心相比,合金元素含量更高,硬化趨勢更強,殘餘奧氏體的數量更少,顆粒中心則看不到殘餘奧氏體的出現。
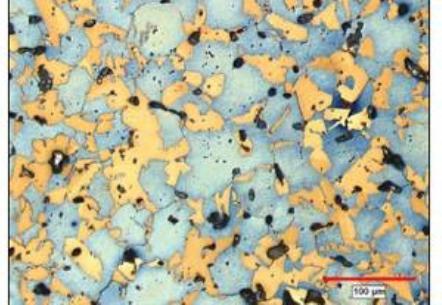
P2-Fig.11 Duplex stainless steel stained to separate the ferrite (blue) and austenite (tan) grains.
(Beraha’s II)雙相不銹鋼合金可以清晰的分辨鐵素體( 藍色) 和奧氏體( 棕褐色) 的兩種晶粒(Beraha’s II)
2.4.6 Duplex stainless steel alloys
雙相不銹鋼合金
I n t h e f i n a l e x a m p l e , t h e t w o p h a s e s i n a duplex stainless steel are separated using adeposited stain. Duplex stainless steel alloys are a combination of austenite and ferrite that are formed due to partitioning of the alloying elements during sintering. The difficulty in performing a metallographic analysis on these alloys is that both the austenite and ferrite are similar in appearance when etched with a standard etchant, e.g.
glyceregia. Both phases are white, with boundaries separating the individual grains.
It is often of interest to estimate the proportions of the austenite and ferrite in order to predict the behavior of the alloy. To do this, the surface shown in P2-Fig.11 is stained using Beraha’s II.The thickness of the deposit differs for each of the two microstructural constituents. When examined,the ferrite appears blue and the austenite tan. An estimate of the relative amounts of the ferrite and austenite can now be made. It should be mentioned that no preetch was used in this case.
最後一個例子是通過著色技術來區分雙相不銹鋼中的兩種金屬相。雙相不銹鋼中含有奧氏體和鐵素體兩種相,是在燒結冷卻過程中由於合金元素的成分偏析而形成。在常規蝕刻劑處理後,這兩種相在顯微鏡下的形態是很相似的,都是由晶界包圍著的呈白色的晶粒,這就給金相分析帶來了困難。為了評估雙相不銹鋼的性能,通常需要了解其中奧氏體相和鐵素體相各自所佔的比例。為此,可以用Beraha’sII 對樣品表面進行著色處理。處理後兩種相上的沉積膜厚度是不一樣的,在顯微鏡下就可以看到兩種相之間存在明顯的顏色差異,鐵素體相為淡藍色,奧氏體相為淺褐色( P2- 圖.11),然後就可能通過軟體估算出兩種相的比例。需要說明的是這件樣品在著色前未進行預蝕刻處理。
2.5 Optical microscopy techniques光學顯微技術
A n o t h e r a p p r o a c h t h a t c a n b e u s e d i n metallographic investigations takes advantage of several microscopy techniques. The three methods to be discussed here utilise polarised light in different ways. In most cases, polarised light is used in the analysis of anisotropic (non-cubic) materials. These crystal structures react with the polarised light to produce characteristic colours of the sample surface and this can be extremely useful as an analytical tool. Conversely, many of the more commonly used elements in PM (Fe, Cu, Ni, Mn, Cr and Mo) have a cubic structure and using polarised light is not effective for their examination.Nevertheless, some of the compounds containing these elements are anisotropic and sensitive to the effects of polarised light.
利用光學顯微技術也可以對材料的金相進行分析,比如接下來會談到的利用偏振光觀察金相的幾種方法。偏振光技術主要適用於各相異性材料( 非立方晶格)的分析,因為這種晶體結構在偏振光作用下能在樣品表面形成典型的特徵顏色,可以為金相分析提供非常有價值的資訊。但是,最常用的一些粉末冶金材料(Fe,Cu, Ni, Mn, Cr, Mo) 都是立方晶格結構,無法直接利用偏振光技術對這些材料進行金相分析。不過,有些包含這些元素的化合物是各向異性的,能夠跟偏振光發生有效作用。■


